|
Now we are ready to move on to part 3. Now we going to place the com and the copper anode in the plastic container.
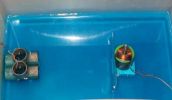
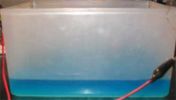
Now place the armature just behind the lexan shield that we have glued to the plastic container. See part 2. You could measure the height of the com with the rubber and make a mark on the outside of the plastic container to know how much solution you need to put in the container. I like to go just 1 mm above the com cut so that I am sure that the copper will fill the whole com. Make sure that the 3 pieces of lexan in the com slots go above this mark. Now on the other side place the copper anode in the container. Make sure that the anode will be also above the waterline because we need to attach the + this copper anode. See picture. 1 and 2 


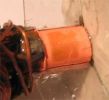
Attach the + of the battery to anode and the – of the battery to the wire that come from the armature. Remember to attach the resistor or else you are going to burn the com. Now look close at the com and see if there are any bubbles coming the com. If you see this remove the – from the battery and some drop of sulfuric acid to the solution. Just a few drops will do and reattach the minus. Continue doing this until the bubbles disappear. Keep checking with a volt meter that the current stays about 0,27 – 0,37. After about two hours the com should have a slight pink color. See picture. 

The growth should be between 0,05 -0,1 mm. I prefer a slower growth as the copper will be much harder. If you want the copper to be slightly softer go for a 0,09 - 0,1 mm growth. Now you should be able calculate the time it should stay in the solution before you can remove the armature. I sometimes remove the armature to check if there are no holes on the com. If you find holes or see that the copper is not growing on certain spots get a x-acto knife and it clean it and replace it in the solution. I leave the mature for about 14 -36 hours in the solution. Depending a lot on volt and growth. If you see that the com is not growing remove some solution and add some distilled water to the right level. It is difficult to say how much you need to add. It is just keep adding and keeping a watchful eye on the volt meter. You could also use a amp meter and try to keep the amp at 0,5 amps. Practice will make perfect. It has take a long time to get the right solution. Here are some rules to make sure everything goes right. 1. It the com is growing to quickly add some drops of sulfuric acid to the solution.
2. if the com is not growing add some distilled water.
3. keep the voltage stable.
4. Do not drop the com in the solution. If you do clean it with warm water and dry it with hair dryer.
5. Yes you can remove the com during the process but do not touch the com with your hands. If you keep these simple rules you should end with a com that looks like the picture below. 
|